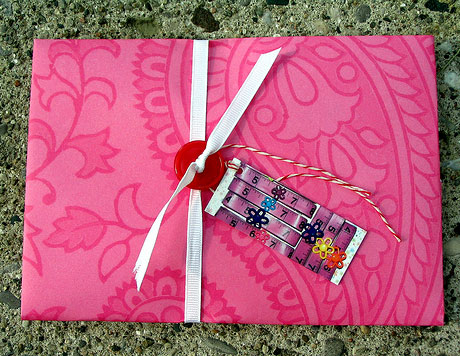
Bright as a button
« See all ideasSometimes the world seems full of people who can wrap a gift to perfection. Straight-wrapped, matching corners on patterned paper - and neat, clean lines from every angle. Others are masters of the romantic feel, exquisite tissue paper with delicious satin bows all tied up with delicate fingers.
And then there's the rest of us.
People in a rush, all fingers and thumbs and wonky edges. Our best intentions stuck to the wrong side of the paper and our patience all tied up in knots.
You'll be glad to know there are some simple touches that can help you hide some of your frustration! We spotted this delightful little package over on Flickr. All wrapped up and ready to go, it's part of a swapping exchange and it caught our eye immediately.
While these edges are actually straight, who's even looking at that now? No one - they're all looking at that cute little button and the lovely MiniCard attached! A neat little focal point to draw the eye away from the bad bits and add a little magic.
It's such simple, clever idea we wish we'd though of it ourselves, but the lovely Melissa let us share it with you.
She's added a full tutorial - complete with how-to photos over on her site.
Essentially, you need a button, some ribbon, and a MiniCard. Choose buttons with a large enough hole to thread the ribbon through - and use tweezers if you need to. There's no need for a fancy bow, just a simple knot will do.
If you're using this idea to embellish packages from your online store, add MiniCards with photos of your products on one side and your url on the other. The MiniCard acts as a cost effective, professional way of branding your items, and reminding people just where this great little package came from. There's 100 MiniCards in every box, so you'll be able to brand a lot of packages for your money.
If this is for a gift, why not create tags with photos of the recipient? There's nothing more fun than getting photos off the computer and into your hands!
Melissa mentions matching the MiniCard with the paper, which is a great idea. We also think this would look rather stylish in simple brown paper - just choose a bright button and ribbon to match.
Happy wrapping!
Many thanks to Melissa for the great idea, and the tutorial.
- Written on:
- 18 Jun 2013
- Categories:
- MiniCards, Crafting, Illustration, Christmas, Wedding, Special Events, Pre-prepared Artwork
Create your own MiniCards...
- Upload your images These can be photos or full artwork. Alternatively import images from Flickr, Facebook or Etsy.
- Or browse MOO templates Use one of our layouts to create professional and creative cards
- Make your cards! In no time at all have amazing MOO cards to share!
- Start making now


